Chocolate for Professionals
Chocolate for Home Bakers
Craft and Innovation
- For Manufacturers
- Where to buy


THE JOURNAL | Pastry Arts Magazine
The Art and Science of Cocoa Powders
Knowing the variables so you can find the right solution
Pastry Arts Magazine6 Min Read

By Rebecca Kuehn, R&D Manager, Guittard Chocolate Company and
Donald Wressell, Executive Pastry Chef, Guittard Chocolate Company
Cocoa powder is a key ingredient that is used in a variety of applications across the culinary spectrum. Despite its prevalence, it remains as mystifying as it is useful, Debunking the unknowns surrounding this functional, strategic and tactful ingredient will empower you, the chef, to choose the right one for the right recipe and for the right desired outcomes to make your deserts, ice creams and bakery items shine.
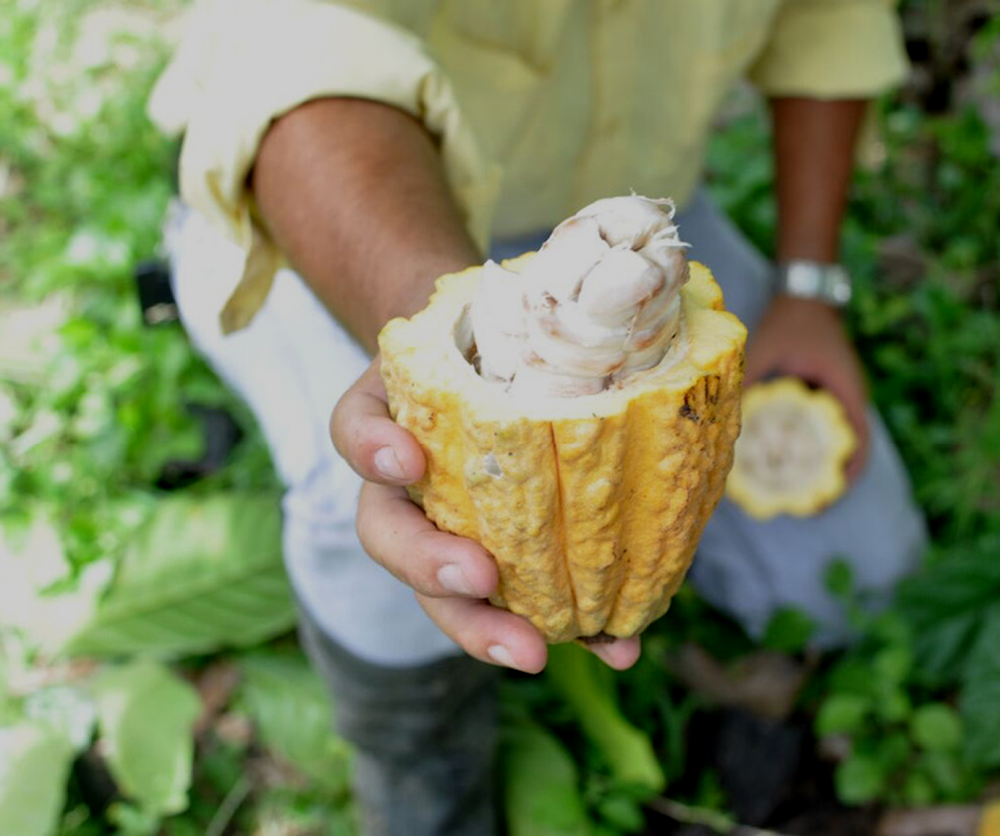
But first a little context: Cocoa powder is made from unsweetened chocolate; unsweetened chocolate is comprised of ground nibs which contain cocoa butter and cocoa solids. The unsweetened chocolate is put through a press, separating a portion of the cocoa butter from the cocoa solids. Cocoa butter is put back into the chocolate making process meanwhile, the remaining solids are what we know as cocoa powder.
There are three primary attributes that impact cocoa powder performance and flavor-processing, fat content and color. The two former variables affect the latter, which simply underscores the interconnectedness of processing variables and cocoa powder attributes, emphasizing that one size doesn't fit all.

Process
Natural or Dutch Process
Dutching is the process of mixing an alkalizing agent or base salt with chocolate to neutralize the product. It can be done at different parts of the process, using different types of agents and at different ternperatures-a11 of which affect the color and flavor of dutched cocoa. Chocolate typically has naturally occurring acidity; by dutching it, the product receives a higher pH, becoming more basic. The more intense the dutching process, the higher pH and darker the color. This will also have an impact on the leavening reactions in some recipes for baking when using Dutch processed cocoa vs. natural cocoa. There's a wide range of flavors that are developed from dutch processing. While neutralizing the acidity, dutching can strip the complex chocolate notes from a powder and instead deliver flavor characteristics ranging from mild to rich traditional cocoa-forward flavors to even salty, Oreo-cookie type notes.
Fat
High, Medium and Low
The amount of fat in the finished cocoa powder is dependent on the amount of pressure applied to unsweetened chocolate during processing. As more pressure is applied, more fat is pressed out of the unsweetened chocolate and less fat remains in the resulting cocoa powder. The labeling of cocoa powders is determined by the FDA; within that labeling are percent fat ranges and their corresponding titles. Standards of identity for low fat cocoa requires the content to contain less than 10% cocoa fat. High fat is nothing less than 22% cocoa fat by weight. High fat cocoas are traditionally known as breakfast cocoas, for their rich and flavorful ingredients. Due to the challenges of achieving less than 10% cocoa butter content, powders are typically categorized into medium (10-12%) and high fat (22-24%) contents. Different fat content is desired for different types of applications.
Color
Light, Dark, Red
When assessing colors, there are two ways of doing so - intrinsic (wet color) and extrinsic (dry color). A natural cocoa is very light in color and the more dutching the cocoa goes through, the darker it becomes; it can result in an almost black cocoa that will have a significant impact on the end product in color and flavor. Fat content affects cocoa powder color. Consider two cocoa powders of similar levels of dutching, but with different fat contents. The higher fat cocoa powder (if well tempered), will have a rich, dry color because of the way that the cocoa butter reflects light. Higher fat powders will subsequently have lighter intrinsic colors because higher fat converts to less cocoa solids, and it's the cocoa solids that carry the color in application. The color can appear different if combined with a white background (milk and cream) compared to a clear (water or oil) background. The color of a cocoa powder cannot be solely judged by its dry color if it is to be used in a baked good, beverage, or frozen dessert.
Chocolate Caramel Ice Cream Sandwiches
By Donald Wressell, Executive Pastry Chef, Guittard Chocolate Company

Chocolate Gelato
Ingredients
1162 g 4% milk
210 g heavy cream, 40%
150 g Guittard Cocoa Rouge unsweetened cocoa powder
110 g dextrose
240 g granulated sugar
70 g Gelato Base 50
Method
Blend all ingredients together with an immersion blender.
Cook to 185°F (85°C).
Process in a batch freezer.
Chocolate Jaconde
Ingredients
125 g whole eggs
88 g confectioners' sugar
88 g almond flour
38 g pastry flour
15 g Guittard High Fat Natural Cocoa
160 g egg whites
40 g granulated sugar
20 g melted butter
Method
In the bowl of an electric mixer fitted with the whisk attachment, whip the eggs, confectioners' sugar and almond flour to a light ribbon.
Sift together the pastry flour and cocoa powder.
In the bowl of an electric mixer fitted with the whisk attachment, whip the egg whites and the granulated sugar to medium peaks.
Fold 1/3 of the whites into the yolk mixture at a time, followed by the flour mixture and melted butter. Spread onto a half sheet pan that is lined with a silicone baking mat. Bake at 380°F (193°C) for about 15 minutes.
Ice Cream Sandwich Cookies
Ingredients
149 g all-purpose flour
43 g Guittard Black Cocoa
3 g baking soda
3 g salt
70 g unsalted butter
136 g granulated sugar
60 g dark brown sugar
15 g vegetable oil
40 g egg yolks
5 g vanilla extract
62 g whole milk
Method
Sift together the flour, cocoa, baking soda and salt.
In the bowl of an electric mixer fitted with the paddle attachment, cream together the butter and sugars. Add the oil and continue mixing until slightly pale. Add the egg yolks and vanilla and mix thoroughly. Add the dry ingredients in three additions, alternating it with the milk in two additions and mixing until completely blended.
Roll dough between 2 sheets of parchment paper to about 1/8" thick. Freeze the dough, cut desired shape, then freeze again before peeling back opposite side of parchment paper to release the dough.
Bake on parchment paper or silicone baking mat at 350°F (176°C) in a convection oven for about 12 minutes.
Caramel Coulis
Ingredients
190g heavy cream
½ vanilla bean split and scraped
1 g salt
70 g water
165 g granulated sugar
15 g butter
Method
Combine the warm cream, vanilla bean, and salt. Set aside.
Combine the sugar and water, cook to a deep caramel. Deglaze with butter. Slowly add the cream mixture. Bring to a boil then remove from heat. Allow to cool.
Emulsify with an immersion blender. Cast into desired mold.
Assembly
Choose a silicone mold shape for the finished sandwich.
Cut the Jaconde 10% smaller than your mold size. Apply Caramel Coulis to the Jaconde with a spatula, creating an insert; blast freeze. Pipe gelato halfway up the side of the mold and top with the Jaconde-caramel insert. Cap with gelato as needed. Blast freeze.
Remove the gelato from the mold and apply pre-baked cookies. Place into a freezer for at least 24 hours, allowing the cookies to soften slightly before enjoying.


Join Our Newsletter
Stay up-to-date with new product releases, Guittard updates and chocolate recipes. No spam, we promise.